Add Files to a Space
min read - Updated on Nov 06, 2026You add feedback to a Space one file at a time: an export of call center transcripts, a month of NPS survey answers, a batch of social media posts. Each file joins the records already in the Space instead of becoming a separate analysis, and Kimola classifies every one of its texts with the Space's Funnel as soon as it is uploaded. The first file of a Space sets its schema: the date column, the text fields Kimola classifies and the columns kept with every record. Every later file is matched to that schema, so the Space stays comparable from its first file to its latest one.
You upload files from the Space's Files page with Add data, which opens a wizard of three steps: Dataset, then Schema for the first file or Columns for every later one, then Upload. A new Space opens this wizard right after it is created, and an empty Space also offers Upload the first file.
Spaces are available in the Enterprise package. They are also available in Kimola On-Premises.
The First File Sets the Schema
A Space keeps growing for as long as its channel produces feedback, so Kimola needs to read every file the same way. The first file you upload decides how. Its columns become the Space's schema, which tells Kimola four things about every file that follows.
Date Column is the column that dates every record. It shows the Space's trends over time and what changed since the last upload.
Text Fields are the columns that hold the texts to classify. A Space can have one or more, each with a name of your own, such as Transcript or Customer Comment. Every text field is classified by every model of the Funnel.
Kept columns are all the other columns of the file, such as a product, a region, a store or an agent's team. They are not classified, but you can filter, segment and compare your feedback by them.
Customer Column is optional. It holds whose feedback a row is: a customer code, an ID, a number or an email.
Plan the first file with the files after it in mind.
Later files must bring the same date column and the same text columns, and a column that is not in the schema is not kept from a later file. Once set, the schema stays until every file of the Space is taken back.
Also, if the next exports of your channel will carry an extra column you want to filter by, include it in the first file.
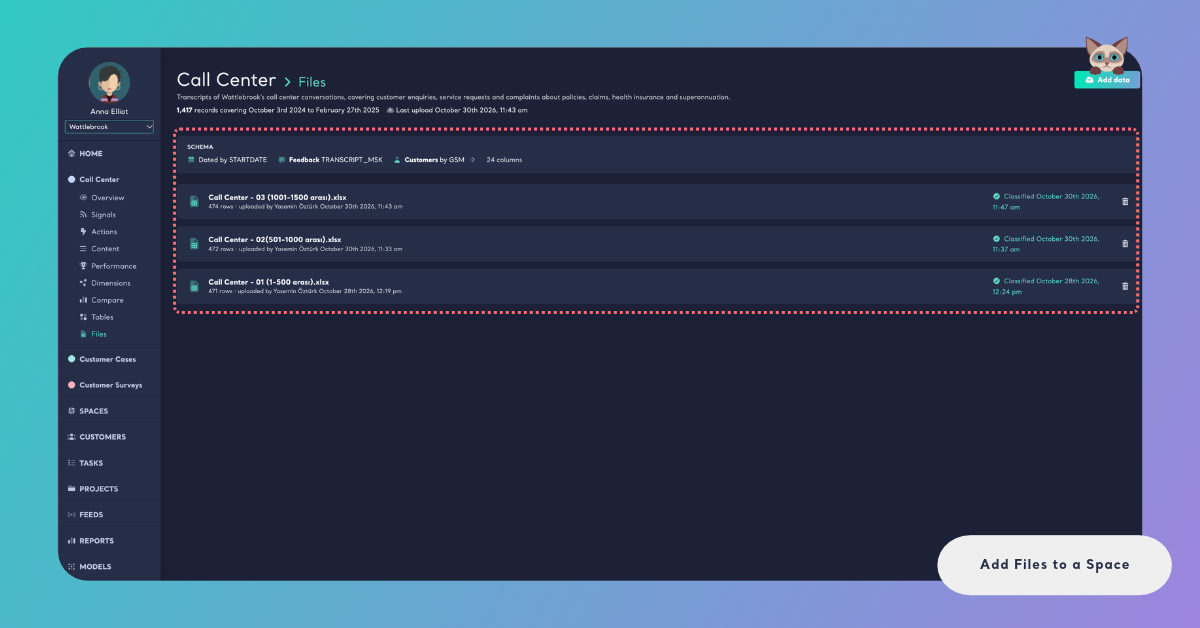
On the Files page, the Schema card shows the schema of the Space: the column it is dated by, each text field with its columns, the customer column if there is one, and how many columns the Space keeps.
Step 1: Upload the File
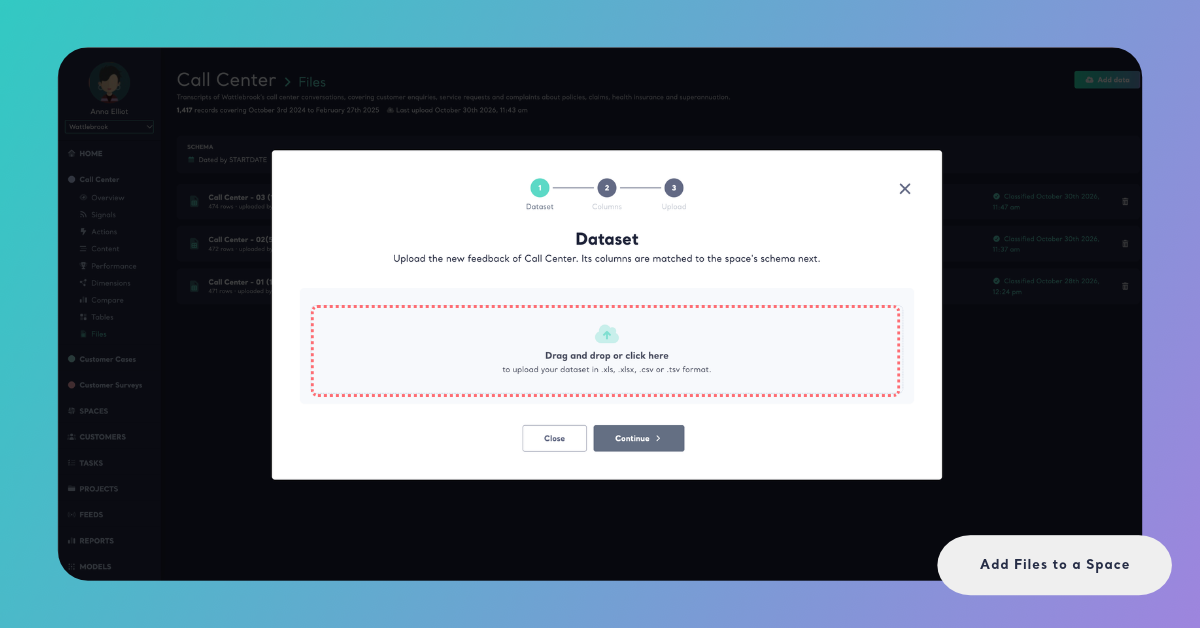
Open the Space, go to Files and click Add data. For an empty Space, click Upload the first file. The Dataset step opens. For the first file it says "Upload the first file of" the Space, and that its columns become the Space's schema. For later files it says "Upload the new feedback of" the Space, and that its columns are matched to the Space's schema next.
Drag the file into the box or click it to choose one. Kimola reads .xls, .xlsx, .csv and .tsv files, one file at a time, up to 30 MB. Each row of the file becomes one record of the Space, and the first row must hold the column names.
When the file can't be used, the step says why:
- "The file is larger than 30 MB. Please upload a smaller one."
- "The file is empty."
- "Please upload one file at a time.
- "Please upload an .xls, .xlsx, .csv or .tsv file."
For the first file, Kimola also checks the column names, because they become the names of the schema. "Every column of the file needs a header. Please name the empty ones and upload the file again." means a column has no name. "Two columns of the file are named" followed by a name means two columns share it; give them different names and upload the file again.
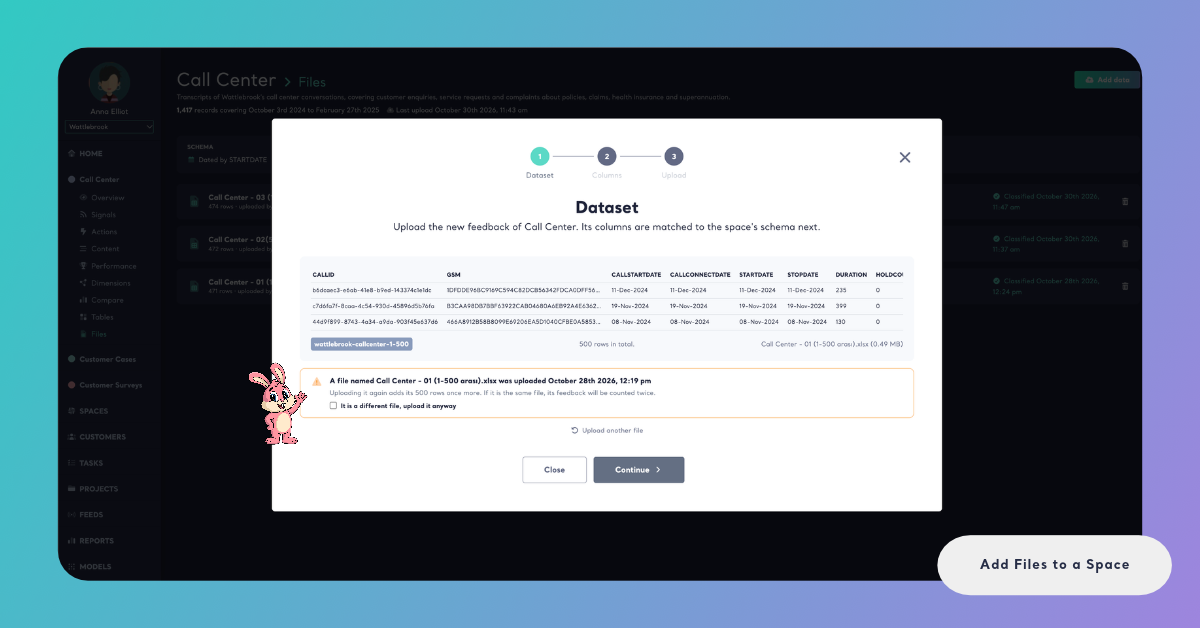
If the Space already has a file with the same name, the step warns you: "A file named" the same "was uploaded" on a given date. "Uploading it again adds its rows once more. If it is the same file, its feedback will be counted twice." This protects a Space from counting the same export twice, which would inflate its volumes and shift its trends. If it is a new file that happens to have the same name, for example a monthly export that is always called the same, tick It is a different file, upload it anyway. Otherwise click Upload another file and choose the right one.
Click Continue. For the first file, the Schema step opens; Steps 2 to 4 below happen there, on one screen. For a later file, the Columns step opens; see Adding Later Files below.
Step 2: Choose the Date Column
The Schema step starts with "Tell which column dates your feedback, and which columns hold the texts to classify." On the left is the Date Column: "Your space grows over time: the date of every record shows its trends and what changed since the last upload."
Open Choose the Date Column and pick the column that says when each piece of feedback was written or received: the date of a call, of a survey answer, of a post. Under the list, the value of the file's first row is shown, so you can check that you picked a date and not an ID. Every file of the Space is placed on the same timeline by this column, which is what lets the Space compare its latest files with the records before them.
Choose the date of the feedback itself rather than the date the file was exported.
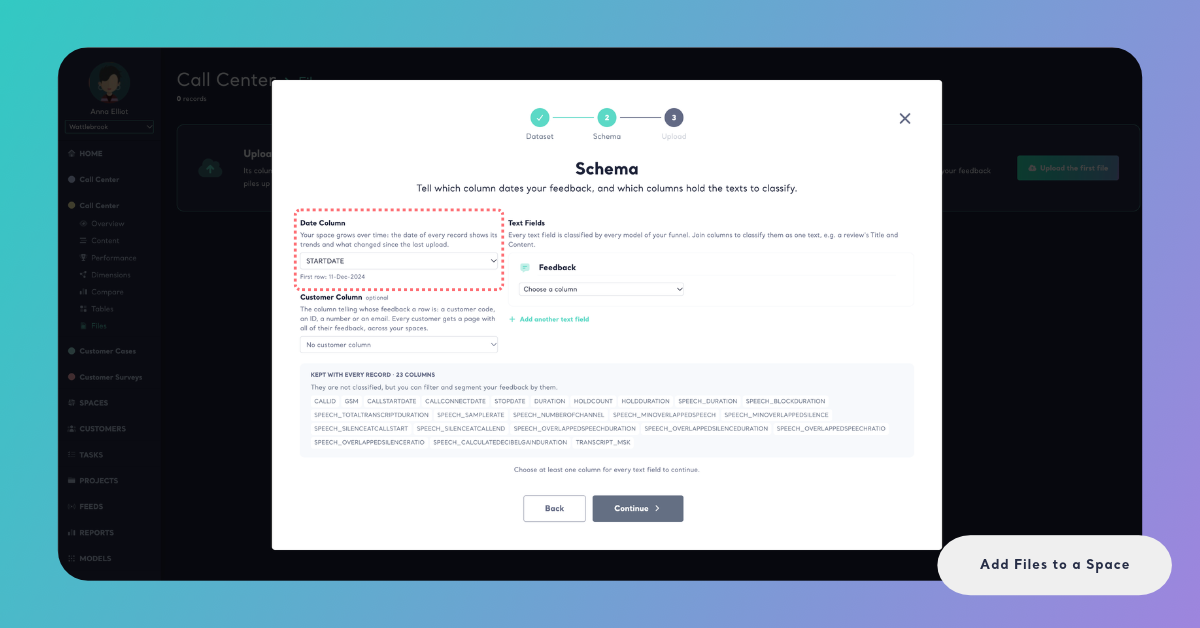
The date column is required. Until it is chosen, the step says "Choose the date column to continue."
Step 3: Choose the Text Fields
On the right are the Text Fields: "Every text field is classified by every model of your funnel. Join columns to classify them as one text, e.g. a review's Title and Content."
The step starts with one text field named Feedback. Rename it after what the texts are, for example Review, Transcript or Comment, in Name this text field, e.g. Review. A name holds up to 50 characters. Then pick the column that holds the texts under Choose a column. The first row of the file is shown under the field, so you can see what will be classified.
When one text is spread over several columns, join them. A review often has a Title and a Content column; a survey may ask "What did you like?" and "What should we improve?" in two columns that answer the same question together. Choose the first column, then Join another column to add the next. The columns are classified as one text. To take a column out, click the cross next to its name.
When a file holds texts that should be read separately, add a text field for each. Click Add another text field, name it and choose its columns. Each text field is classified on its own, and on the Space's pages you can read the records through one text field or all of them. To remove a text field, click Remove this text field.
For a telecom operator, a call center export might have the customer's words in one column and the agent's notes in another. Each gets a text field of its own.
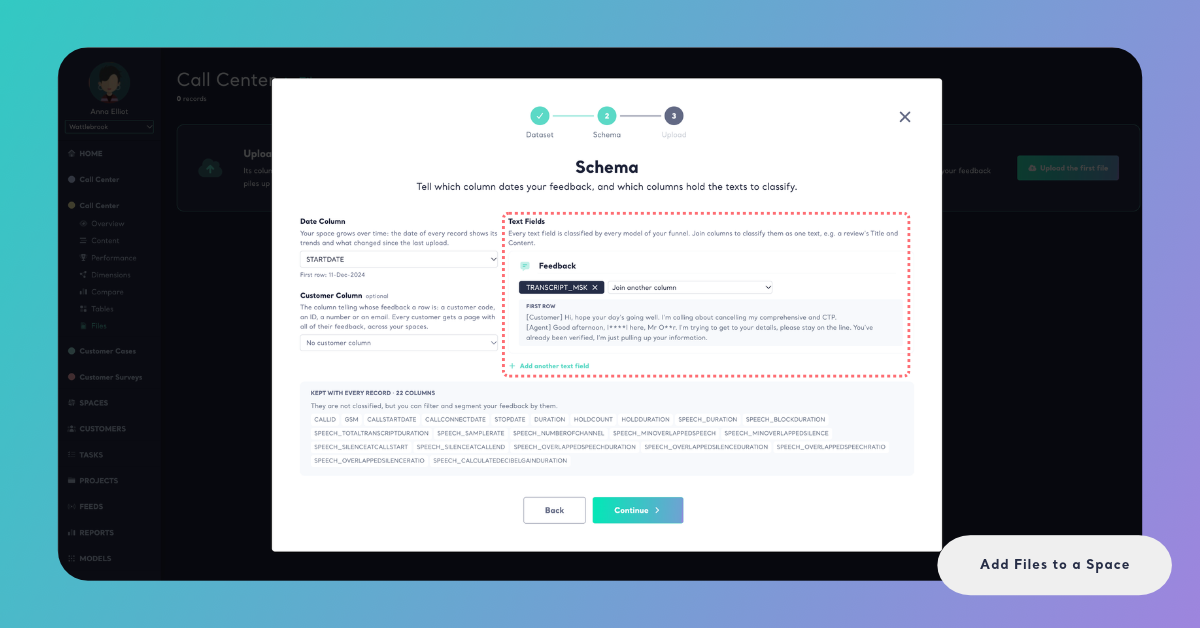
Every text field needs a name and at least one column, and two text fields can't have the same name. Until they do, the step says "Name every text field to continue.", "Choose at least one column for every text field to continue." or "Two text fields have the same name."
Below the fields, Kept with every record lists the columns that are not classified: "They are not classified, but you can filter and segment your feedback by them." These columns are what Filter Records in Spaces and Compare in Spaces work with.
Leave columns such as IDs, codes and categories out of the text fields.
Step 4: Choose a Customer Column (Optional)
Under the date column is the Customer Column, marked optional: "The column telling whose feedback a row is: a customer code, an ID, a number or an email. Every customer gets a page with all of their feedback, across your spaces."
Choose it when your files identify the customer behind each row, for example a customer number in a call center export or the email of a survey respondent. Kimola then recognizes the same Customer in every Space that uses the same identifier, and gathers all of their feedback on one page. Values are matched ignoring upper and lower case and surrounding spaces.
If your files don't identify customers, leave it at No customer column. You can set one later, either with a later file or on the Files page for the records already in the Space, without classifying anything again. See Add a Customer Column to a Space.
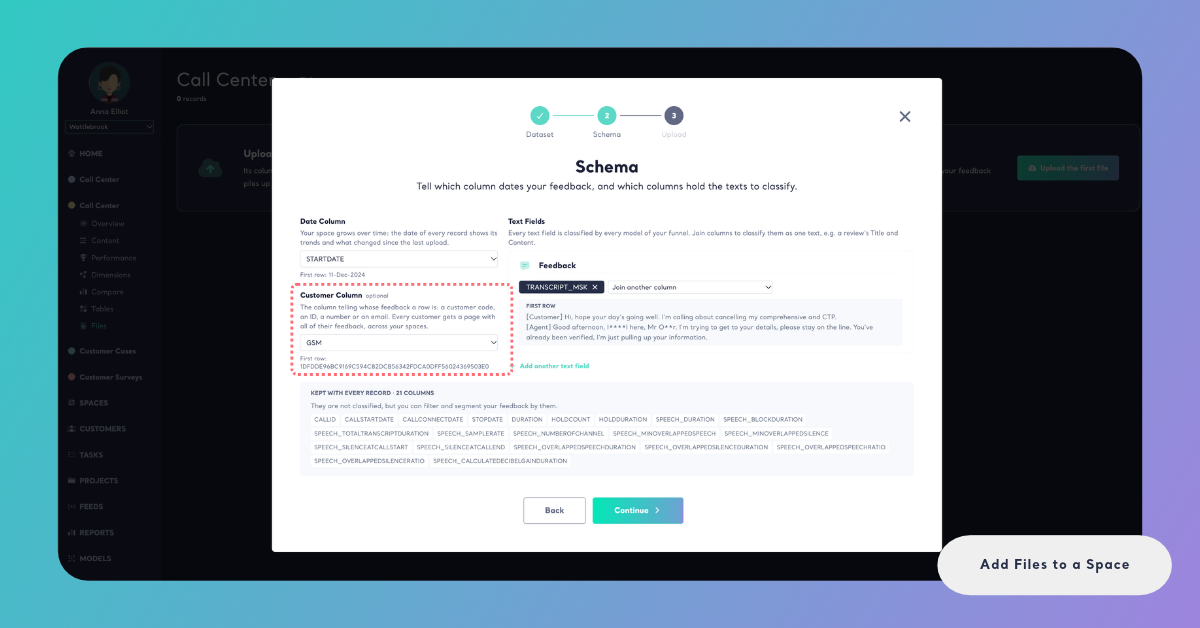
When the date column and the text fields are set, click Continue.
Step 5: Review and Upload
The Upload step says "Your feedback is classified with" the Space's Funnel "as soon as it is uploaded." Its Summary shows what will happen before anything is classified: the file's name and its number of rows, the Space it goes into with its records so far, the customer column if there is one, and the queries the file will use.
The queries are counted as rows × models × Dimensions: every analyzed row multiplied by the number of models and the number of Dimensions of the Space's Funnel. See How to Calculate Queries, and kimola.com/pricing for the queries in each package.
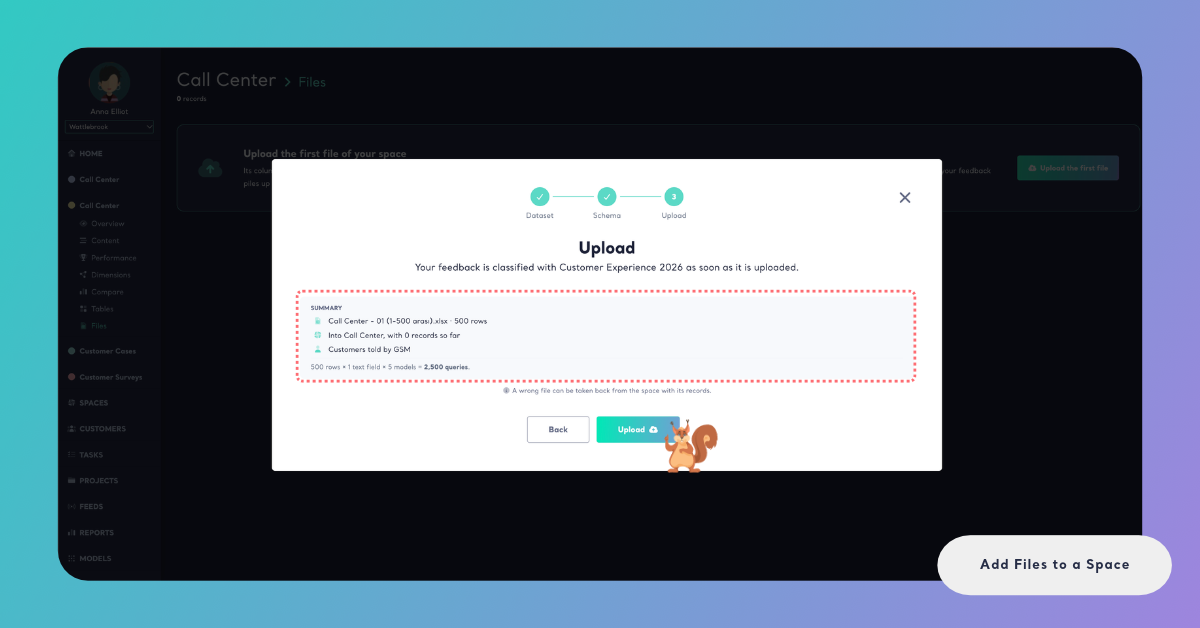
Check the summary and click Upload. "A wrong file can be taken back from the space with its records." If you need to change something first, click Back. If the upload can't start, the step says why: "Your plan has no queries left to classify this file.", "The uploaded file has expired. Please upload it again." or "The file has no rows to classify."
Adding Later Files
Every file after the first is matched to the Space's schema instead of setting one. The wizard's second step is Columns: "Match the columns of your file to the space's schema. Your matches are remembered for the next file."
The step lists every column of the schema under Space, each marked with what it is: Date, the name of its text field, Customer or Kept. Under FILE you choose the column of your file that matches it, and First Row shows that column's first value, so you can check the match. Kimola matches columns with the same name for you, ignoring upper and lower case, and it remembers the matches you choose: if the next export calls the column "Comment" again instead of "Review", it is matched without asking.
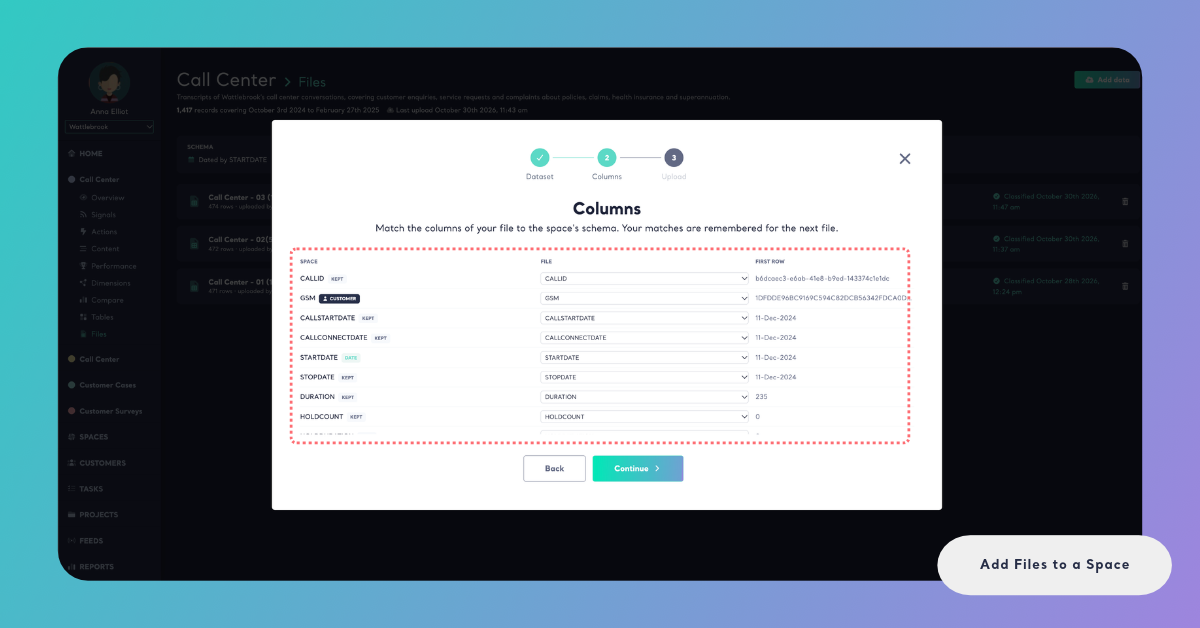
The date column and the columns of every text field are required. A required column with no match shows Choose a column, and the step says "Choose a column of your file for" the missing columns "to continue." A kept column that the file doesn't have can stay at Not in this file. A column of the file that matches nothing in the schema is listed under "Not in the schema, so not kept:" and is left out of the Space.
If the Space has no customer column yet, the step offers one, marked optional: "Tell whose feedback each row is (a customer code, an ID or an email) and every customer gets a page of their own. It stays the space's customer column for the next files; the files before stay without customers." To give the records of the earlier files their customers too, see Add a Customer Column to a Space.
Click Continue, check the Summary and click Upload, as in Step 5.
Upload files in the order your team works, for example one export a week or a month. Each upload is compared with the records that came before it, so a steady rhythm keeps the Space's trends easy to read.
While a File Is Classified
After the upload, Kimola says the file "is uploaded and is being classified." and classifies every text field of every row with every model of the Funnel. On the Files page, the file shows Waiting to be classified, then Classifying with its progress in percent, then Classified with the date. The page follows the progress by itself; you don't need to reload it. While a Space has a file in progress, the Spaces list and the latest files on Home show New data is being analyzed. You can leave the page; classification continues.
A file counts in the Space only once it is classified. Until then, its records are not in the Space's numbers, charts or records. If it is the Space's first file, the Content page says "Your first file is being classified" and "Its records appear here as soon as the classification is completed."
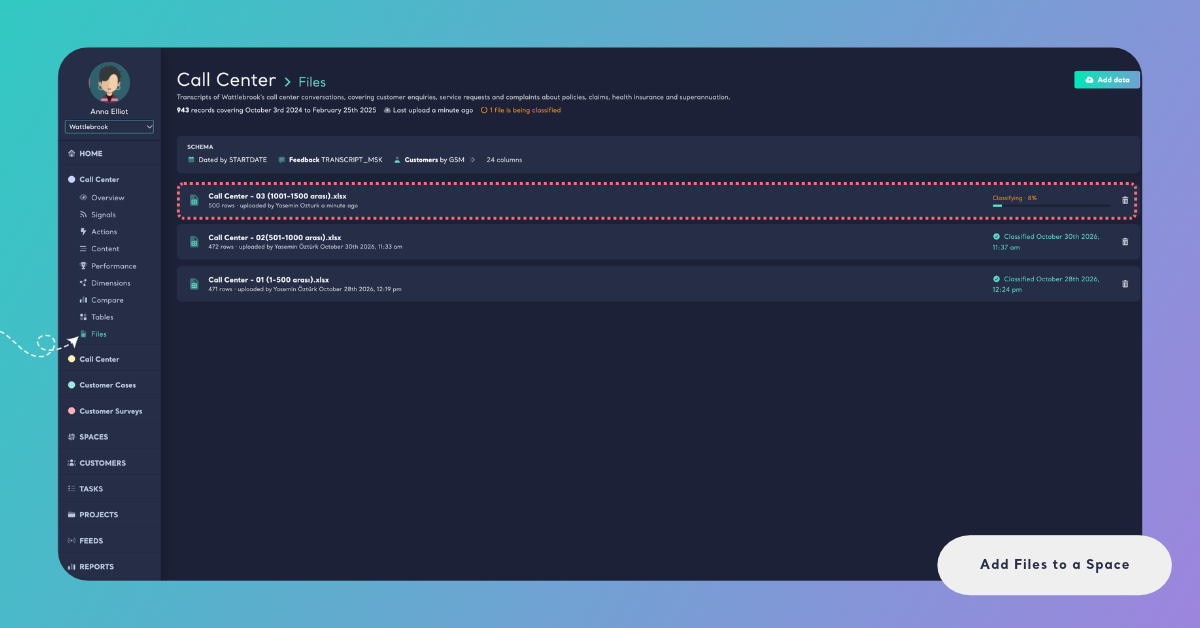
Once a file is classified, the Space is brought up to date with it. Its record count, dates and NPS are recalculated, and the Overview and every other page of the Space read the new records too. Its Signals run again, and they can include the file as a group, so you can see what the latest file brought. Its Insights are written again where the evidence moved; while they are updated, the Overview shows "Updating the insights with the latest files" with its progress. See How Insights Are Updated.
Action Plans are not rewritten by a new file. A plan stays as it was written, and says how many files were classified after it, such as "1 file was classified after this plan was written: its actions do not read it." Click Write a new plan when you want a plan that reads the latest files.
If you uploaded the wrong file, or the same file twice, take it back from the Files page with Take this file back (the bin icon). See Take Back a File from a Space.